PRODUCT FEATURE
Pigment Frame Builder: Hello Beautiful S+S Bundle
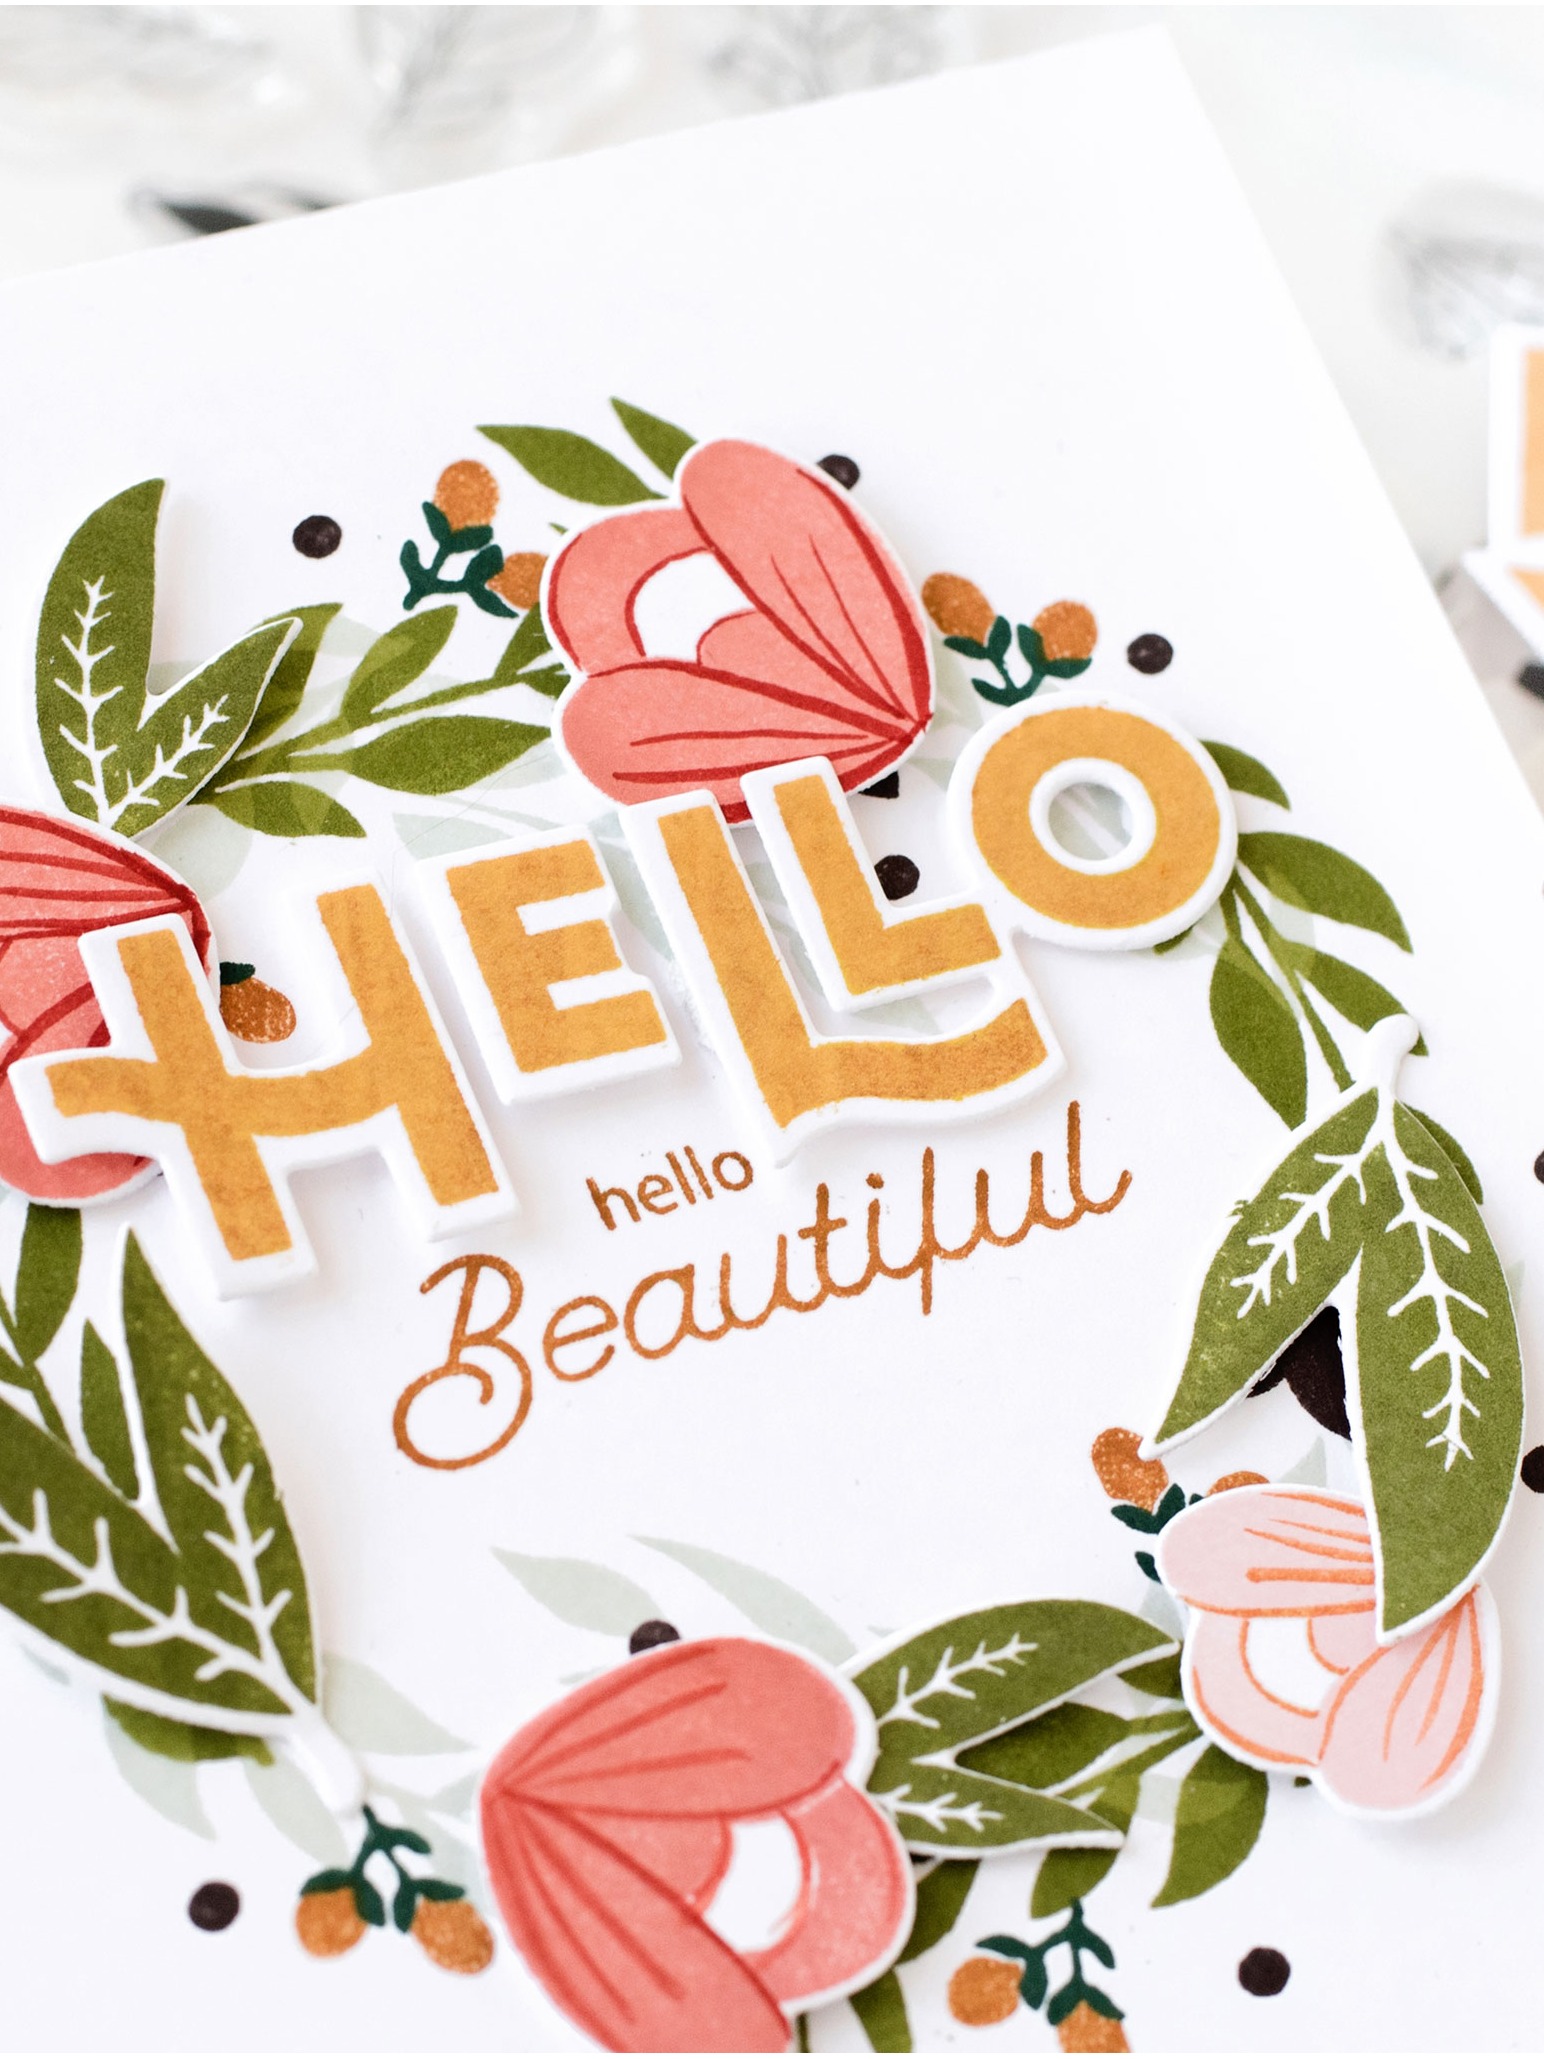
Hey, hi, hello! Today we're taking a peek at the Frame Builder Stamp + Stencil Bundle!
We designed this bundle to help you build a striking, colorful floral frame that can be used to adorn just about any paper project. We've used it for lining envelopes, framing a card design, and we've even gone so far as to snip it up to create wreaths and floral clusters. If you have just ONE floral in your collection, we think this is a great place to start. We've compiled this handy guide to help break down why we love it so much and hopefully inspire you to try using it in new ways.

FRAME BUILDER: HELLO BEAUTIFUL.
Let's take a closer peek!
Coordinating Designs
Stamp the leaves as a guide, use the stencil to add in flowers + layers of precise color.
Use Together or Alone
We love products that flex. Yay for extra mileage and versatility!
Coordinating Dies
Easily cut your finished design, or use individual dies to cut portions.
Eco Friendly
Stencils are made from a sturdy, yet easily recyclable material.
IN THE SHOPPE NOW
MORE STYLES COMING SOON

FRAME BUILDER: HELLO BEAUTIFUL
stamp + stencil bundle

FRAME BUILDER: HELLO BEAUTIFUL
coordinating dies
THE GIST
We LOVE that our Frame Builder can help you easily build an intricate, colorful, layered floral, without having to touch a paintbrush, or other color medium. Or fuss with alignment and positioning. Read on to learn best tips + tricks for using this bundle and how to get creative with it!
HOW TO USE
1
STAMP
Stamp the leafy frame in your fav greenery color. Place the flower stencil over your stamped image, so that it aligns. The flowers should be where the leaf gaps are.
2
ADD BASE COLOR
The flowers you stencil will act as a base color, atop which you can add more detail with stamps. So, we recommend choosing a light-colored ink, in your favorite shade ;)
3
APPLY COLOR
Repeat with next stencil to add berries (leaves help with alignment). Finish things off by stamping with accent stamps to add more detail to the floral frame.
You can see a full step-by-step video here, of how the stamps + stencils work together.
A TIP
To hold your stencil in place, may we suggest the ever-so-handy Make Art tool? The magnetic base helps to keep the stencil snug, without any additional masking tape. Best of all, it's super easy to move the magnets around, when you need to re-position your stencil. If you're into stenciling, we cannot recommend this investment enough.
LET'S GET CREATIVE
There are fun ways to tailor this set.
Whether using the stencils on their own, cutting out bits of your finished floral frame, or using the frame to adorn your paper projects, let us show you the fun you can have with our Frame Builder: Hello Beautiful Stamp + Stencil Bundle.
Layer Up!
Use the stamp + stencils to build a trendy frame.
We love that this S+S bundle is a little different from the others. Instead of using the stencils to fill in an outline stamp, the stamps + stencils work together to help build a striking image! Start by stamping the leaves, and then stenciling in the flowers and berries.
Here, we've further accented by adding a few stamped details like the leaf veins, flower layers, and flower centers.

The amount of layering you do, is up to you! Here, we've combined stamps + stencils, as well as final stamped accents to make a modern floral frame.
Add Detail
Take it a step further by adding in even more stamped detail.
Not only can you add in more detail using the stamps in this set (here you can see we've added some lines to the flower blooms), you can also dress up this frame with our Recipe Builder stamps!
Since the floral frame was designed to fit perfectly onto our Recipe Card Builder dies, all you need to do is mask the frame (with the coordinating die-cut) and stamp the lines over-top. It's a super quick way to get store-worthy stationery. Here's a video that breaks it down step-by-step.

Add accents from the stamp itself, or combine with other stamps in our shoppe, like the Recipe Card Builder set.
Cut It!
Did you know the individual dies can help you cut out all the bits so you can layer your own masterpiece?
The coordinating Frame Builder dies not only help you cut the floral frame, but they also include individual dies (leaves and flowers) to help you cut bits out of your beautiful creation. These can be used alone, or combined with our Hello Beautiful Blooms (a coordinating set of stamps and dies). Helping you build anything you like! From wreaths, to borders, to backgrounds.
We love how effortlessly these products mix + match and we hope you'll love them too! Don't forget, it's a lot easier to build the frame image first, and die-cut later. You can also use your scissors to cut out any bits that are left-over from the dies.
Using the coordinating dies allows you to cut not only the frame, but also individual pieces. Mix + match them with the Hello Beautiful Blooms set, and build a wreath just like this.
Stencil
How about a blooming background, using only the stencils?
The great thing about S+S bundles is that you can use the stencils on their own. You can arrange them into the frame design if you want (like the card we've shared below), but we say, go be a rebel! Ditch the leafy frame, and create a beautiful background instead.
Just position over your paper and stencil. Then rotate and repeat (perhaps in a different color!), until you like what you see. Switch to the leaf stencil and stencil in leaves in the same way. The leaves are already meant to create a layered effect, so all you need to do is line them up. This means you can entirely skip the masking tape to achieve this look (yay)!
To finish, we recommend adding in final touches with the accent stamps, or a little bit of marker detailing. You can view a full video here, on how to make this background from start to finish!

It's perfectly ok to stencil only. It can make for a beautiful background. Add a few stamped details, and marker accents to finish things off.
Thanks For Joining Us.
We hope this guide helps you embark on a creative journey! Be sure to let us know your favorite way to use this bundle over on insta.


Get Creative.Tag Us.
If you love Pigment products, and want to be featured, be sure to tag us up on insta when you share your projects. Don't forget to use our hashtags
#pigmentcraftco #aworldofcolorawaits
For even more inspiration, news, and exclusive projects, join our creative community on insta @pigmentcraftco